Sharing all my Tips & Tricks for How to Make Easy DIY Cedar Flower Planter Boxes from Cedar Wood Boards on a Budget with Pictures.
I recently shared about our Spring Front Porch & how I wished our front entrance had a little more curb appeal.
The front door of our house is a little hidden & I have been trying to find ways to help it stand out.
I asked Jason to help me build a cedar flower planter boxes for each side of our front door & a cedar window box to help draw your eye to the front & add some color with some more flowers.
We had some wood cedar boards leftover from our cedar fence that Jason built.
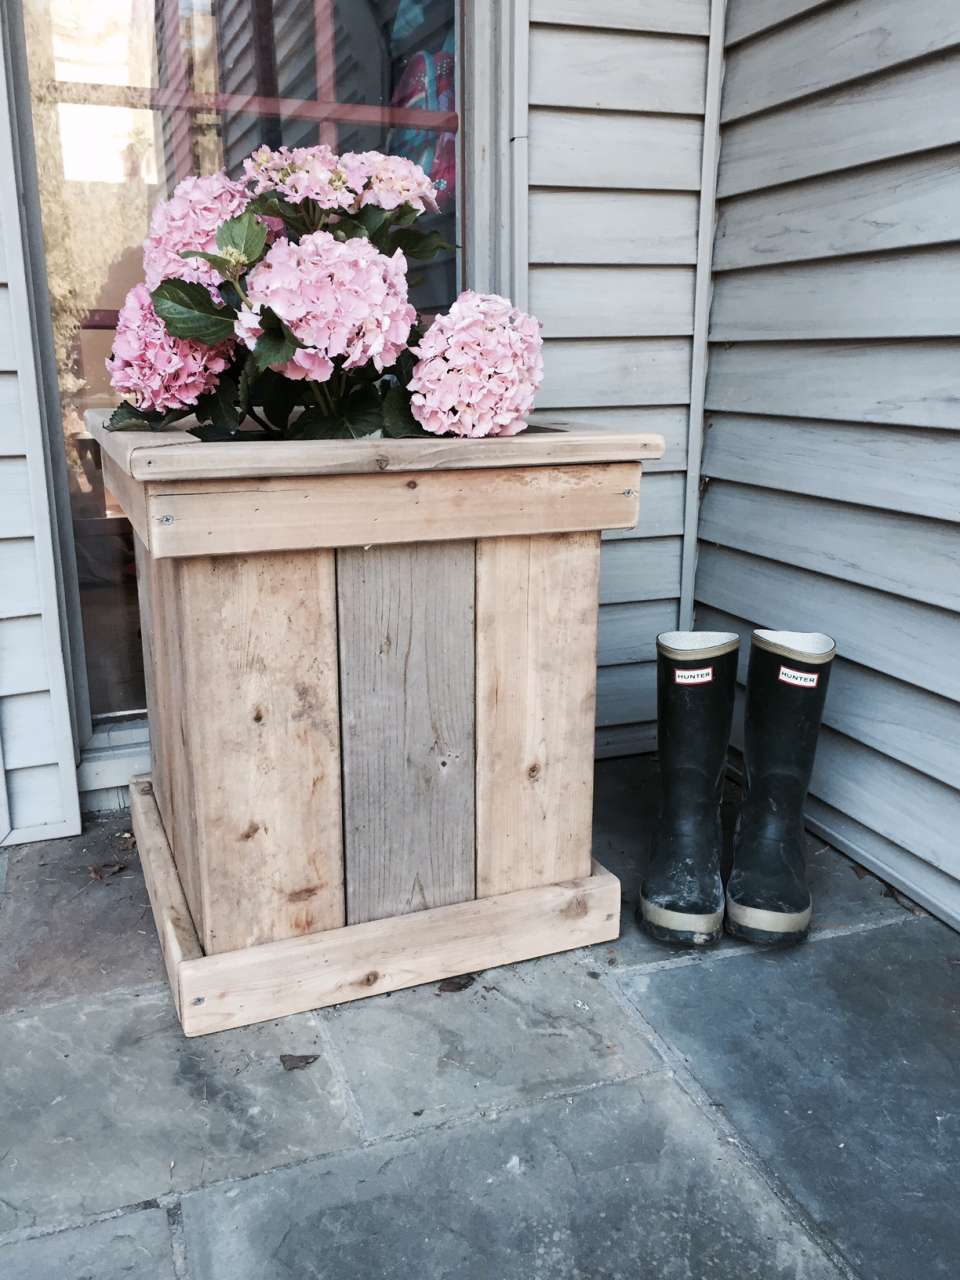
Cedar is a great choice for outdoor flower planters because its bug resistant and weathers naturally and chemical free.
And in our case it was free which is awesome… all Jason needed to buy was some exterior screws!
Table of Contents
DIY How to Make a Cedar Flower Planter Boxes
*this post contains affiliate links for more information check out our disclosure page here*

Supplies & Tools Needed to Build a Cedar Flower Planter Box
- Cedar Wood Boards
- Saw to Cut the Boards
- Exterior Screws
- Screw Driver
- Finish Pin Nailer & Finish Nails
- Beautiful Flowers (I chose Hydrangeas)
Step by Step Instructions for How to Make a Cedar Flower Planter Box
Step ONE – Gather your Supplies & Decide What Size You Want to Make your Cedar Flower Planter Box
Find the wood & decide how big you want the cedar flower planter box to be.
Below is a picture of our cedar wood pile. I was very excited to empty out 1/3 of this pile from one of my garden beds.

Step TWO – Create the Bottom Base of Your Cedar Flower Planter Box
Create the bottom of the cedar planter with 3 boards & a thin strip screwed in at the ends to hold them together…the side you see will be the bottom.

Step THREE – Make the Sides of Your Cedar Flower Planter Boxes
Make 4 sides with 3 boards laid next to each other & a piece of 1 by 3 at one end of the boards that overlaps each end by the thickness of the boards…in my case 1 inch.

Step FOUR – Screw the Sides to the Base of the Cedar Flower Planter Boxes
Screw the first side onto the bottom of the cedar flower planter box.

Step FIVE – Add Trim to the Top of the Wood Flower Planters & Finish off the Top
Attach all 4 sides to the bottom & add another 1×3 trim around the top…I used my finish nailer to nail the trim pieces in place and then added a few screws to really hold it together.

Finish it off the cedar planter with another 1×3 on the top to cover the ends of the cedar wood boards.

Step SIX – Add Beautiful Flowers to Your DIY Cedar Flower Planter Boxes
Put your gorgeous plants inside or in my case, hydrangeas.

I planted my hydrangeas in bigger plastic pots that I placed on top of a few scrap boards to have it be the right height for our new cedar flower planters boxes.

Cedar Flower Window Box
Jason also made me a window box out of some cedar boards as well for the window above our front door.

It’s basically a large rectangle. I put a plastic window box inside of it along with some pink snapdragons, ivy and white bacopa.
We moved our cedar flower planters down to our driveway where they flank our brick flagstone stairway when we landscaped the front of our farmhouse.
I added roses to the planters this past spring & evergreens in the winter.

I hope this inspires you to build a DIY Cedar Flower Box at your Home!
by Tara Lehman
Don’t forget to Save & Pin our Cedar Flower Planter Boxes or Follow along on Pinterest!

7 Things I Do to Get my Garden Ready for Spring
My Mailbox Garden for Storing Garden Tools
Some More Gardening Ideas You Might Enjoy


What a great project using the leftover cedar planks. I know we have a few cedar planters that are getting so old now, they will need to be replaced soon. Thanks for sharing at the Tuesday Garden Party.
Shelly, thank you so much for stopping by & for hosting the Tuesday Garden Party! I love seeing everyone’s gardening projects on there:)
Wow. I am seriously impressed. Beautiful!
Deborah, thank you so much for taking the time to stop by:)
wow that’s huge! It’s impressive and I bet it will look stunning when there are more blooms. I absolutely love the texture of that wood. great job! I saw you via the stone cottage adventures linky party and i’m glad I stumbled my way here 🙂
Claire, I am so glad you stopped by!!! My husband worked hard on making them and I will let him know:) Hope you are having a beautiful day in the UK!!!
This is a beautiful planter and will only get prettier as it ages. For awhile now I’ve been thinking of adding some window boxes to my house but never gave it a thought to make them out of cedar. You’ve totally put me in the mood to start doing some work outside now that spring in here!
I’m cohosting a link party right now and would love if you’d share this with our readers. This is a quality project and I’m always looking for posts that will make a good feature 🙂 Have a great day!
Jamie, Thank so much for stopping by and introducing yourself:). I just hopped over to your beautiful blog and it was so fun to see that you are in PA as well! I will definitely be sharing this project with your link party. Thanks so much for inviting me! Hope you are having a beautiful spring day!!!
Great job! I love the size and shape and the natural wood!
Thanks for sharing! Pinning!
Karen
Karen thanks so much for checking it out:)
Sure 🙂 You are actually one of my 2 features for Monday 🙂
Wow Karen! Thank you so much!!!
Wow Tara very impressive! I love the look of the natural wood and the pretty trim you added. Thank you so much for sharing at SYS and have a wonderful week!
XO Barbara
Hi Barbara! Thanks so much for coming to check out my cedar flower planter:). Thank you for hosting Share Your Style! Have a great day, take care, Tara
What a pretty way to frame your door! Featured you at Be Inspired this morning. Thanks so much for sharing!
Wow Sharon! What a wonderful surprise!!! Thank you very much:)
this is a lovely diy,I invite you to share at my link party ( you can share until Sat midnight) hugs!
Thank you so much for stopping by and for the invitation to your link party Katherine!