How to Build a Super DIY Wood Basketball Hoop in Hours!

Our DIY Wood basketball hoop was incredibly easy to make & only took a few hours build for just the cost of a basketball rim. And it's a hit for those home bound rainy days!!! #basketball #diy #basketballhoop https://lehmanlane.net

Our DIY Reclaimed Wood basketball Hoop was incredibly easy to make & only took a few hours to build for just the cost of a basketball rim. Sharing all of our tips & tricks for how to make an awesome DIY wood basketball hoop with pictures. It’s a hit with our kids for those home bound rainy days when they are stuck indoors!

DIY Reclaimed Wood Basketball Hoop

*this post contains affiliate links for more information check out our disclosure page here*

Our DIY Reclaimed Wood basketball Hoop was incredibly easy to make & only took a few hours to build for just the cost of a basketball rim.  Sharing all of our tips & tricks for how to make an awesome DIY wood basketball hoop with pictures.  It's a hit with our kids for those home bound rainy days when they are stuck indoors! #diy #basketballhoop Https://lehmanlane.net

Hands down our family’s favorite sport is basketball.

With the kids home this Spring & so many rainy days to come we decided to make an indoor DIY wood Basketball Hoop for our new home gym/ office.

With most of the furniture out of the room, thanks to our new bookcase turned entertainment center (see that here) we have plenty of room for the kids to let out ALL this extra energy they have!!!

Although our basement ceilings are low (7 feet), we decided it would still be fun to make the kids a DIY reclaimed wood basketball hoop since they love playing basketball together & can’t play outside when the weather is bad.

Supplies Needed for a DIY Wood Basketball Hoop

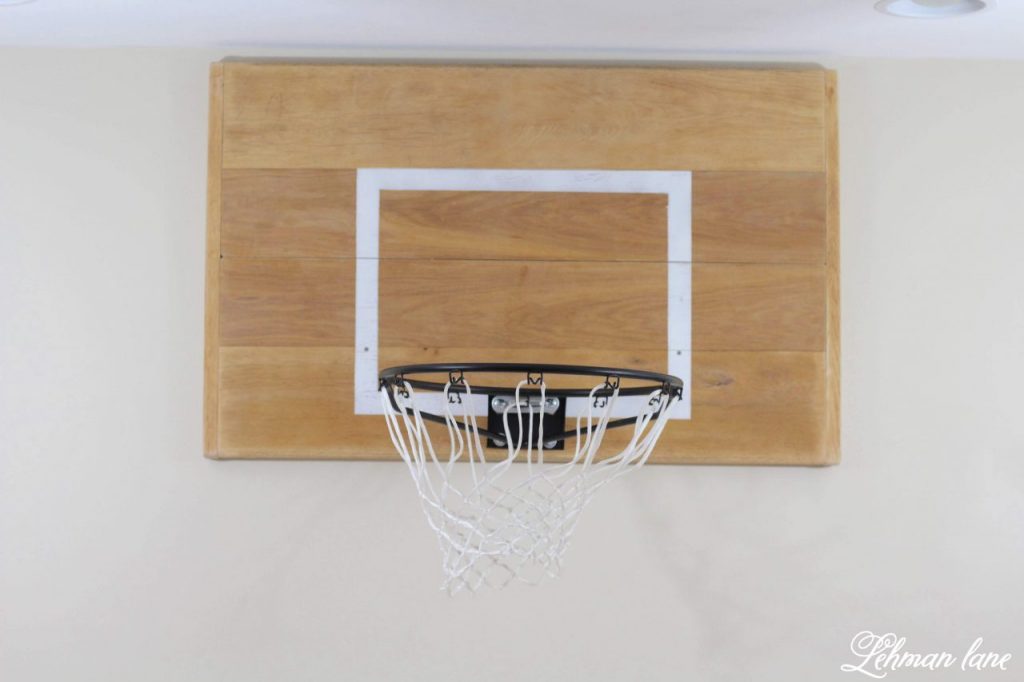
Our DIY Basketball Hoop Backboard Dimensions are 27″ inches high & 44″ wide.

  • Reclaimed Wood for Basketball Wood Backboard
  • Saw to Cut the Wood to Size
  • Basketball Hoop (we purchased this one Here)
  • Spray Paint
  • Scrap Wood to Secure the Wood Basketball Backboard to the Wall
  • Screws & Screwdriver

How to Build/ Make a DIY Wood Basketball Hoop in 4 Steps…

Step ONE – Creating the Wood Backboard for the DIY Basketball Hoop

Jason had some leftover wood from our former dining room church pew (see that here) that there had been some controversy over.

Long story short, I wanted to keep the church pew & Jason wanted to build benches for our dining room instead.

Jason won & he built 2 benches to replace the pew.

Our DIY Wood basketball hoop was incredibly easy to make & only took a few hours build for just the cost of a basketball rim.  And it's a hit for those home bound rainy days!!! #basketball #diy #basketballhoop https://lehmanlane.net

However, I do have to admit that I love the character the old reclaimed wood from our former church pew gives to both the DIY wood basketball hoop backboard as well as our bookcase/ entertainment center.

Our DIY Wood basketball hoop was incredibly easy to make & only took a few hours build for just the cost of a basketball rim.  And it's a hit for those home bound rainy days!!! #basketball #diy #basketballhoop https://lehmanlane.net

Our custom DIY wood basketball hoop backboard is a bit smaller than regulation size so we could fit it in our room. Jason cut the reclaimed wood boards for the backboard to be 27 inches high and 44 inches long.

Once the pew boards were cut to the same length Jason attached some spared oak boards to the attach to span any board seams and hold the boards together.

Our DIY Wood basketball hoop was incredibly easy to make & only took a few hours build for just the cost of a basketball rim.  And it's a hit for those home bound rainy days!!! #basketball #diy #basketballhoop https://lehmanlane.net

Step TWO – Painting the White Square on the Wood Backboard

Once the DIY wood basketball hoop backboard was together Jason painted on the white square with the same spray paint we used for Audrey’s nightstand & desk. (see those makeovers here)

Our DIY Wood basketball hoop was incredibly easy to make & only took a few hours build for just the cost of a basketball rim.  And it's a hit for those home bound rainy days!!! #basketball #diy #basketballhoop https://lehmanlane.net

Printer paper & masking tape did a great job creating the perfect square for our wood basketball hoop with spray paint.

Our DIY Wood basketball hoop was incredibly easy to make & only took a few hours build for just the cost of a basketball rim.  And it's a hit for those home bound rainy days!!! #basketball #diy #basketballhoop https://lehmanlane.net

Step THREE – Securing the Basketball Hoop Wood Backboard to the Wall

To secure something heavy to a wall a good method is to cut 2 boards at a 45 degree angle the length of it.

You can then attach one board to wall securely finding the studs to screw into such that it will receive the similar board attached to the backboard and draw it into the wall.

For the DIY wood basketball backboard Jason doubled this up and did 2 boards on the wall and 2 boards on the back of the backboard.

Our DIY Wood basketball hoop was incredibly easy to make & only took a few hours build for just the cost of a basketball rim.  And it's a hit for those home bound rainy days!!! #basketball #diy #basketballhoop https://lehmanlane.net

Measure carefully to space out the angled boards appropriately that are attached to the wall and the angled boards attached to the back of the wood basketball hoop backboard.

Once these are attached you should just be able to lift the backboard up to the wall and set it in place.

Jason found that the backboard rattled when a ball bounced against it more than he liked so he also put 2 screws through the front of the wooden backboard to the wood he had already screwed into the wall.

Our DIY Wood basketball hoop was incredibly easy to make & only took a few hours build for just the cost of a basketball rim.  And it's a hit for those home bound rainy days!!! #basketball #diy #basketballhoop https://lehmanlane.net

As you noticed from the picture of the back of the backboard Jason finished off the sides with some wood from the pew to give it a nice finished look and hide the support boards on the back of the wood basketball hoop backboard.

Our DIY Wood basketball hoop was incredibly easy to make & only took a few hours build for just the cost of a basketball rim.  And it's a hit for those home bound rainy days!!! #basketball #diy #basketballhoop https://lehmanlane.net

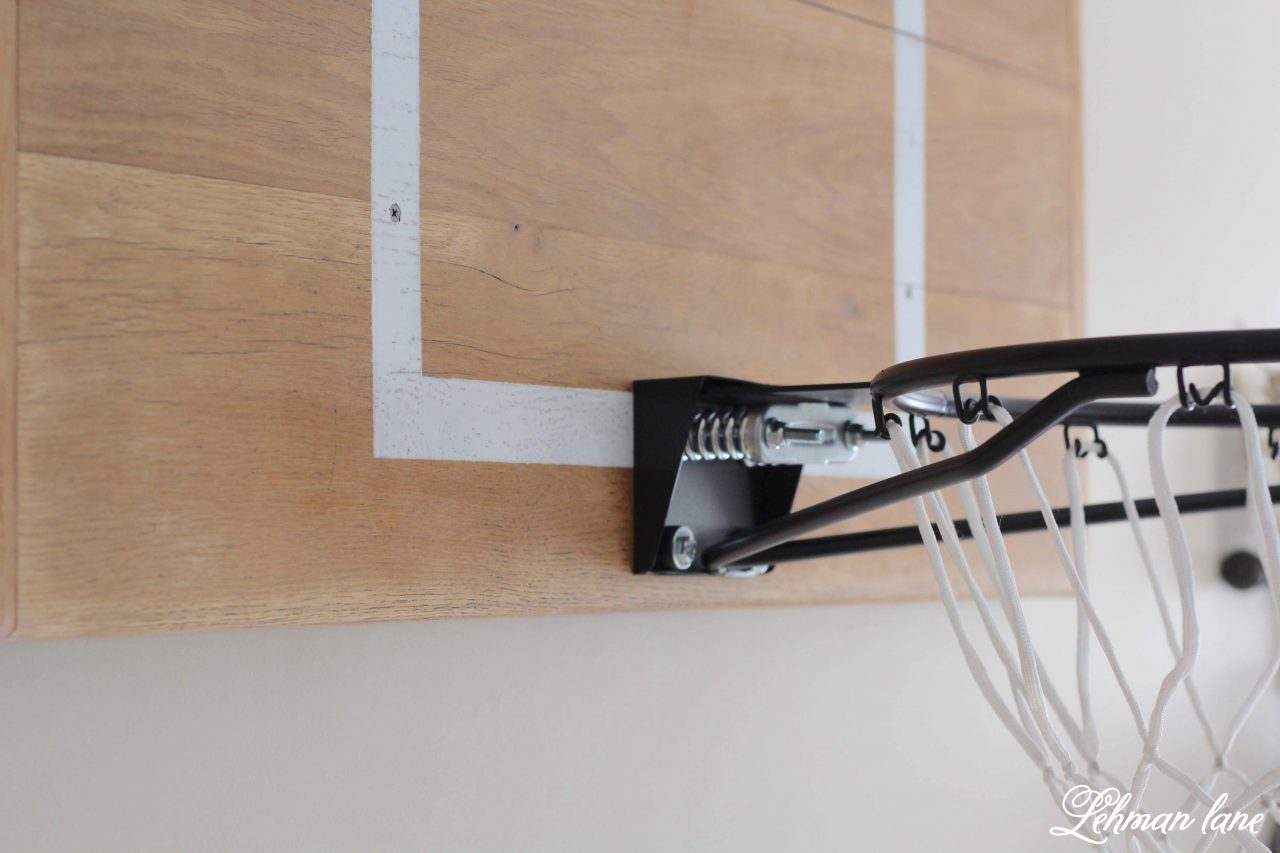
Step FOUR – Attaching the Hoop to our DIY Wood Basketball Hoop Backboard

Our DIY Wood basketball hoop was incredibly easy to make & only took a few hours build for just the cost of a basketball rim.  And it's a hit for those home bound rainy days!!! #basketball #diy #basketballhoop https://lehmanlane.net

We added this basketball hoop to the wood baseboard.

Our DIY Wood basketball hoop was incredibly easy to make & only took a few hours build for just the cost of a basketball rim.  And it's a hit for those home bound rainy days!!! #basketball #diy #basketballhoop https://lehmanlane.net

It took the kids no time to start putting our DIY Reclaimed Wood Basketball Hoop to use.

Our DIY Wood basketball hoop was incredibly easy to make & only took a few hours build for just the cost of a basketball rim.  And it's a hit for those home bound rainy days!!! #basketball #diy #basketballhoop https://lehmanlane.net

Our family is not known for our height & everyone was excited to FINALLY be able to dunk. 🙂

See our Home Gym & Exercise Room with our DIY Wood Basketball Hoop (here)

DIY Home Gym, Exercise Room & Office -We transformed our basement into a home gym/ exercise room & office. This is a simple & inexpensive DIY project for the basement of our farmhouse.#homegym #exerciseroom #diy https://lehmanlane.net

I hope this inspires you & answers all your questions about how to create a DIY Wood Basketball Hoop at your home!

by Tara Lehman

DOn’t forget to pin & save our DIY Wood Basketball Hoop to your Favorite Pinterest Board!

Our DIY Wood basketball hoop was incredibly easy to make & only took a few hours build for just the cost of a basketball rim.  And it's a hit for those home bound rainy days!!! #basketball #diy #basketballhoop https://lehmanlane.net

Spray Painted Furniture Makeover

8 DIY Desks to Try

Some more DIY Projects you might enjoy

How to Make a Tire Swing - The kids have been bugging us to make a tire swing that 2 people could swing on at once. The tire swing we made was simple to create, inexpensive, and was up in less than an hour! #tireswing #backyardswing https://lehmanlane.net
10 Pallet Furniture Projects to Build to bring Farmhouse Character to your home for FREE #palletprojects #farmhousestyle https://lehmanlane.net
DIY - How to Build a Horseshoe Pit - Today I am sharing all about how to build a Horseshoe pit for your backyard. It was super simple to make, inexpensive, and our whole family loves to play it. #diy #horseshoepit https://lehmanlane.net

Leave a Comment

Your email address will not be published. Required fields are marked *