
We added a bead board ceiling to our son’s room. The bead board ceiling gives his room a ton of farmhouse character, & looks great next to his navy blue walls. It is also the perfect DIY ceiling idea to cover over an ugly popcorn ceiling & add a level of insulation insulation at the same time!
Table of Contents
DIY – Bead Board Ceiling to Hide an Ugly Popcorn Ceiling
*this post contains affiliate links for more info click here*


One of the first things we did to our son’s room after changing the doorway was add a bead board ceiling.
This was not the first bead board ceiling we added since we moved into our old farmhouse. Last year we added 4×8 bead board sheets to the ceiling in our youngest son’s room & LOVED how it turned out that we wanted to add it to all our ceilings! You can see that HERE.

Why we Chose Bead Board Ceiling
Bennett’s room had a textured popcorn plaster ceiling that was in poor shape.
We wanted to change it but didn’t want the mess of taking down the plaster and installing new drywall.
Instead of the thin 4×8 sheets of bead board we wanted something that had a little more strength to it so we decided on 3/4 inch tongue and groove bead board from Home Depot.

Bead boards sheets are definitely cheaper, lighter, & less work but there is something nice about adding the real thing!
The bonus of adding a layer of wood to the ceiling is that is room is noticeably warmer, which is great in a drafty old farmhouse. 🙂
DIY – How to Install a Bead Board Ceiling
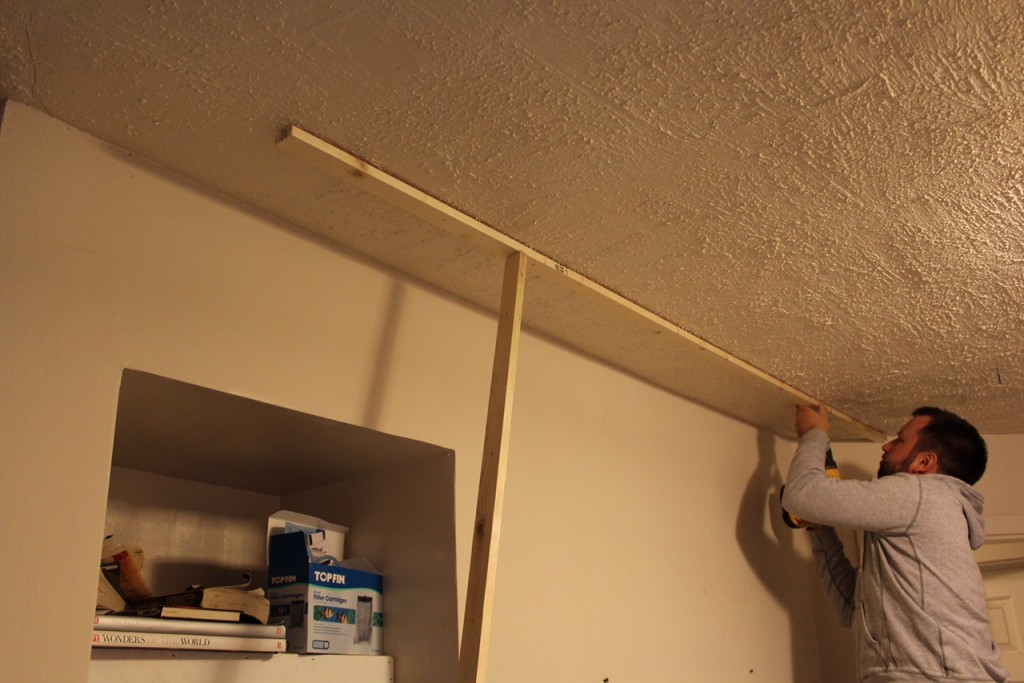
Add Shim Boards to Attach the Bead Board To
1) We zipped down basic 2 X 4’s on the table saw into 1/2 inch thick strips.


2) We located the ceiling joists and screwed the 1/2 inch strips through the plaster and into the ceiling joists with 3 inch screws.
This helped secure the plaster to the ceiling so that it wouldn’t continue to crack and later fall down and it also provided a nailing board to attach the bead board to.

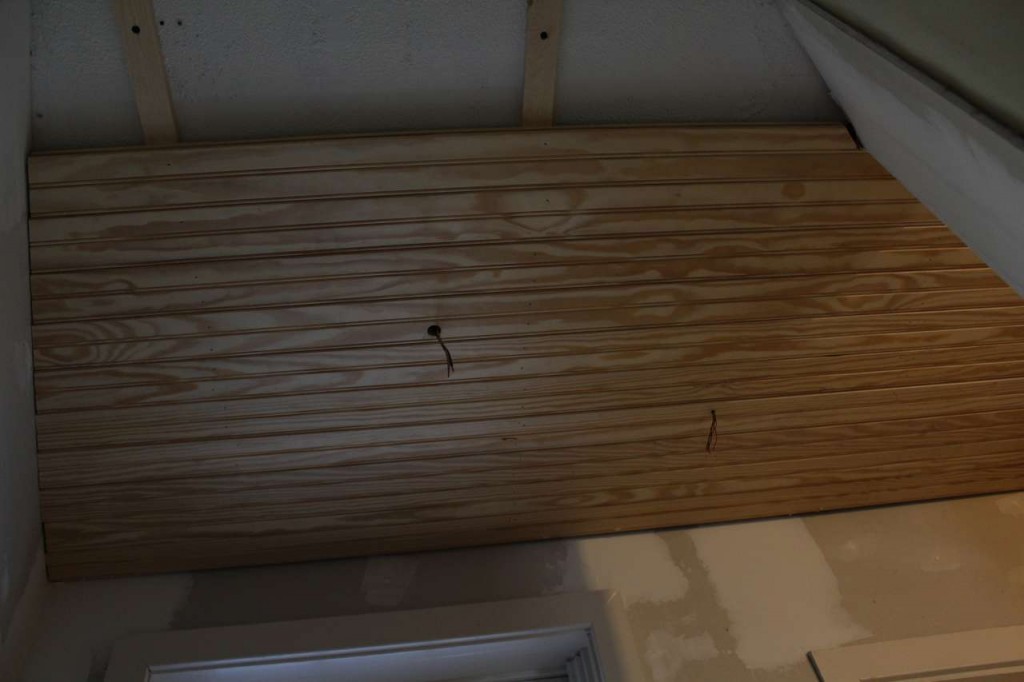
Nailing the Bead Board Ceiling to the Wood Shim Strips
3) We nailed the bead board tongue and groove boards to the 2×4 strips using a finish nailer. Originally there was a separate light and fan in the room. We decided to buy a fan and light combo so it would make the ceiling less busy.
4) We primed and painted the ceiling white and added a new ceiling fan from Home Depot. I think you all will agree that his ceiling looks way better than before.


We added bead board to the ceiling in our hallway already and plan on adding it next to Ryan’s room which we will start remodeling this weekend.
Ben’s Room is DONE!!! See the full reveal HERE

To see more pics of Ben’s original room click HERE for the original plan we started with and here for the doorway change.
We have loved the look of our DIY Bead Board ceiling so much that we have added it to our son Ryan’s built in bedroom (HERE), our boys bathroom using a vinyl bead board ceiling (HERE), & our newly remodeled farmhouse kitchen below. (HERE)
I hope this inspires you & answers all your questions about how to install bead board ceiling at your home!
by Tara Lehman
Don’t forget to save & pin our DIY Bead Board Ceiling!

Changing the Doorway and Adding a Transom Window (HERE)
See more DIY Projects you might enjoy


Tara that is some transformation! It looks fantastic and it is in keeping with the farmhouse tradition!
Thanks Mary! We are really happy with how it turned out:). take care, Tara
It looks beautiful! What a difference it makes!
Thanks Amy!!!
It looks fabulous! I’m so thankful you shared this. We may try it in our bathroom that has the old drop down ceiling tiles. This would look so much better! Keep up the great posts!
Thanks so much for stopping by to see our bead board ceiling Cori! Best of luck trying it in your bathroom, if it’s a bathroom with a tub or shower you may want to check out the PVC or vinyl tongue and groove bead board which they sell at either Home Depot or Lowes (I can’t remember which sells it or maybe both do) My husband and I plan to add the a PVC bead board to our kids bathroom soon. The PVC is exterior grade so you wouldn’t have to worry about moisture as much as you would with real wood. If you are talking about a 1/2 bath than I think the wood bead board would work just as well. Take care, Tara
I love anything beadboard.
Happy New Year Susan! Bead board is great:)
The ceiling looks great Tara! We did planks in our kitchen last year so I know that doing anything to a ceiling is hard work . 🙂
Thanks so much Kristi! It was a lot of work but totally worth it. Take care, Tara
Tara! This turned out so well! ❤️❤️❤️❤️
Thanks Crystal!!!
It really does add tons of character to the room! I love it!!
Thanks Johlene! We really love the look of the bead board. Take care, Tara
Wow that looks awesome!!! I wish i was as talented as you guys!
XO Ellen from Ask Away
http://www.askawayblog.com
Thank you so much for stopping by to see our bead board ceiling and for your sweet comments Ellen!!!
Wow, Tara! Quite the transformation! And so much character! Love it! Looking forward to the final reveal, Cynthia
Thanks so much Cynthia! The bead board ceiling was definitely a lot of work but we love the look of it:). Take care, Tara
Love it! Am really interested in knowing what type of paint you used for the ceiling. It looks like a high gloss white.
Thank you so much for stopping by and for your sweet comments about our bead board ceiling Terri! After priming the boards we used a semi-gloss white paint. It’s the same paint we used for all of the trim in our house, Sherwin Williams Emerald semi gloss extra white:). Take care, Tara
It has such a beautiful finish. Thank you for letting me know. I will put it on my “good to use” list!
I love it! I’m not a fan of our textured ceilings and even less of a fan of the idea of what’s involved in scraping them. You have the perfect solution!
Thank you so much for stopping by to see our plan for our son’s room!!!
If these are 4/8 sheets how did you hind the end seems, or is the room smaller than 8 ft wide?
Thanks so much for stopping by to check out my bead board ceiling Sue! For this ceiling I used tongue and groove boards but I did use 4/8 sheets in my other son’s room which you can find here, http://lehmanlane.net/boys-bedroom-remodel/ and I used 1 X strips every four feet painted white to hide the seams.
How did you hide the seams where the bead board butted against each other ?
Thanks so much for stopping by to check out our Bead board ceiling Terry! With bead board tongue and groove planks the seams are scattered/staggered around the room and limited to the small end where we had to butt one next to another. We certainly tried to limit the seams as much as possible but they really disappear once you paint the bead board. For any seams that stood out used a little wood filler and gave them a quick sanding before painting to minimize the seam. Seams do become a problem if you are using the 4×8 sheets of bead board because you have a long seam in one location. In our youngest son’s room we used 4×8 sheets and covered the seams with 1x2s (here is the link to his room, http://lehmanlane.net/boys-bedroom-remodel/ )
Where did you get your ceiling fan? Love the bead board ceiling!!
Thanks so much for stopping by to see our DIY bead board ceiling Pam! We found the ceiling fan at the home depot. Although, I love the look of the fan I have found that the bulbs it uses are expensive and a pain to replace.
What sheen did you use on the ceiling?
Thanks so much for stopping by to check out our DIY bead board ceiling Steve! We just used a flat white ceiling paint on the boards.
I am obsessed with this ceiling! Not only the beadboard but the fan. What fan is this?